

If your favourite candle seems to disappear faster than it should, the problem is usually not the wax alone. It's the wick, the airflow around the flame, and that first burn you gave it on day one. In my Ontario workshop, I see the same pattern over and over, a candle with wax clinging to the jar walls, a flame that's been allowed to run too high, and a customer wondering why the jar looks half-finished long before the label says it should.
How to Make Candles Last Longer in Canada starts with that diagnosis. A candle that burns neatly and slowly is usually one that's been trimmed properly, lit in a calm spot, and given enough time to form a full melt pool. Shivora Candles offers hand-poured soy candles and wax melts made in Ontario, Canada, and the same care principles apply whether you're buying for scent, gift giving, or everyday home fragrance.
Table of Contents
- Why Your Candle Burns Down Faster Than You Expected
- The First Burn That Sets the Tone for Every Hour After
- Wick Trimming as a Habit, Not a Chore
- Ideal Burn Sessions and Why Longer Is Not Better
- Cotton Wicks, Wood Wicks, and Wax Melts Compared for Longevity
- Fixing Tunneling, Soot, and Fading Scent Throw
- Storage, Drafts, and Room Placement That Protect Burn Time
Why Your Candle Burns Down Faster Than You Expected
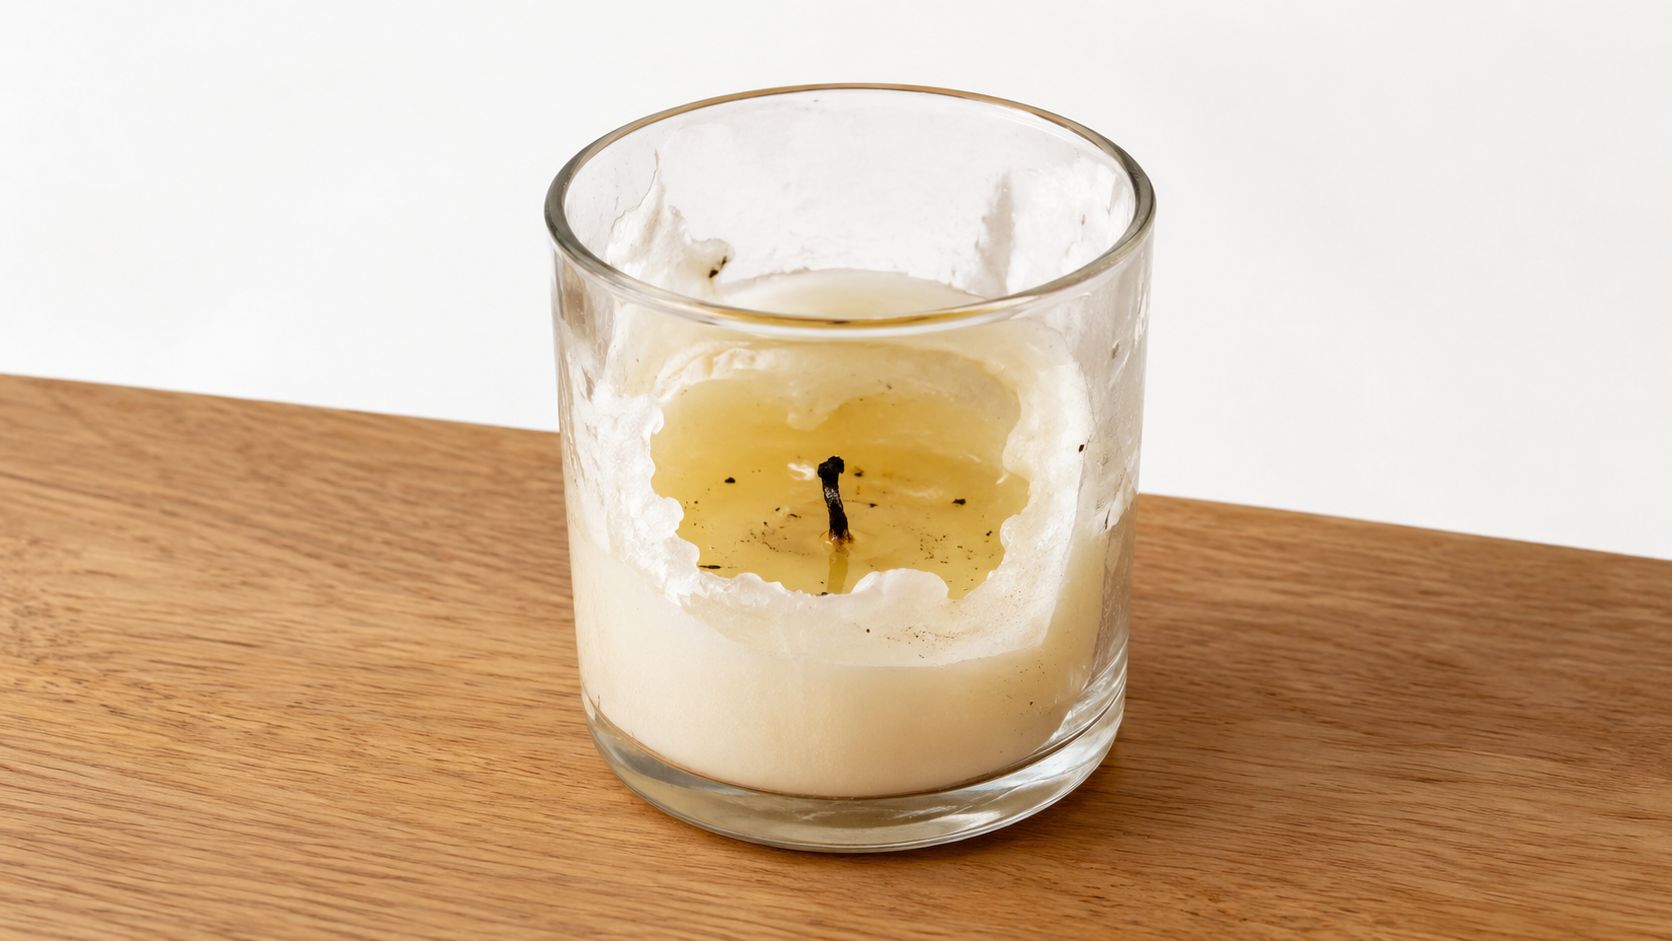
A candle that burns down too fast usually gives itself away before it's fully spent. The flame looks a bit tall, the glass warms unevenly, and a ring of hard wax stays stuck to the sides while the middle disappears. That's not a wax mystery. It's usually a wick-and-airflow problem, with the first burn setting the pattern for every hour after.
The three things that quietly decide candle life
The first variable is wick size. Health Canada advises trimming candle wicks to 5 to 7 mm before lighting and again every 2 to 3 hours during use, because a wick that's too long burns hotter, uses more wax, and makes more soot, while a shorter wick helps the melt pool stay steadier and slower to consume wax (Health Canada candle safety). Quebec's public guidance is even tighter, recommending a wick of about 5 mm before lighting and trimming every 2 to 3 hours if needed (Quebec candle prevention guidance).
The second variable is airflow. A flame in a draft doesn't just flicker, it wastes heat. That heat should be melting wax evenly across the top, not getting pulled sideways by a vent, window crack, or ceiling fan.
The third variable is the memory of the first burn. If the candle only melted down the middle on that first light, it learns the wrong shape. The wax hardens in a narrow well, and every later burn keeps following that tunnel.
A candle doesn't usually fail all at once, it trains itself into bad habits early.
What I watch during test burns
When I test a soy candle, I'm watching how fast the melt pool reaches the edge, whether the wick mushrooms, and whether the flame stays upright. If the flame leans or dances, the candle is telling me the room, not the wax, is the problem. If the melt pool reaches the jar wall cleanly and the flame stays steady, burn time usually improves.
That's why how to make candles last longer starts with diagnosis, not with buying a different fragrance. If the wick is too long, the room is drafty, or the first burn was rushed, even a good candle will waste itself faster than it should.
The First Burn That Sets the Tone for Every Hour After

A candle's first burn decides whether the wax learns the full shape of the jar or starts tunnelling from day one. Trim the wick to about 5 mm before lighting, then let the candle stay lit until the melted wax reaches the glass on every side. That edge-to-edge melt pool uses the full width of the container instead of carving a hole down the middle.
What a proper first burn actually looks like
A good first session usually lasts long enough for the top layer to turn fully liquid, which often takes about 1 to 2 hours depending on jar width (Canadian home fire prevention guidance). You are not racing the clock. You are giving the wax time to set the right memory.
For an 8 oz soy candle, that first burn often lands in the 2 to 3 hour range in real use, depending on the vessel and room conditions. Once that pattern is set, later burns have a much better chance of staying even. If you stop too early, the outer wax hardens into a wall and leaves fuel behind on the sides.
Why tunnelling starts so easily
Tunnelling starts when the wax near the rim never gets hot enough to melt. The wick keeps feeding the centre, the walls stay solid, and the candle burns through usable wax every time you relight it. The flame can also sink into a deeper well, which makes the problem harder to fix later.
Let the first melt pool reach the edge, then stop. That one decision protects every hour that follows.
If you want a fuller walk-through of even burning, Shivora's guide on how to make candles burn evenly fits neatly with this habit. The point is simple. A well-set first burn protects the rest of the candle's life.
Wick Trimming as a Habit, Not a Chore
Wick trimming is the easiest habit to ignore and the easiest one to feel in the jar later. A short wick gives you a cleaner flame, slower fuel use, and less black residue on the glass. Health Canada's 5 to 7 mm benchmark and Quebec's about 5 mm target aren't arbitrary, they're practical measurements tied to safer, steadier burning (Health Canada candle safety, Quebec candle prevention guidance).
How I trim before lighting
I trim before every burn, not after I notice a problem. A proper wick trimmer is easiest because it catches the clipped bit and keeps the cut neat. If you don't have one, small nail clippers work as a backup, especially on narrow jars.
A long burn often leaves a carbon ball at the tip. That little mushroom of char pulls the flame higher, which burns hotter and dirties the glass faster. I remove it before relighting so the next session starts clean.
Practical rule: if the flame looks tall or the wick tip looks lumpy, trim before you strike a match again.
Cotton wicks and wood wicks need slightly different handling
On cotton wicks, the cut is straightforward. Keep the tip short and centred. On wood wicks, the trim sits across the grain rather than straight across, so you're shaping the exposed edge without fraying it.
That matters for Shivora's cotton and crackling wood wick options, because the flame behaviour changes even when the wax is the same. A shorter wick usually means better control, and better control usually means the scent lasts more consistently from burn to burn.
If you want a practical walkthrough, Shivora's how to trim candle wick guide pairs well with what you're doing on the table at home. The goal isn't fussy maintenance, it's keeping the wick in the range where it can do its job without eating the candle too quickly.
What trimming changes in the jar
A properly trimmed wick usually gives you:
- Slower fuel consumption: The flame stays more controlled and doesn't overheat the wax.
- Cleaner glass: Less soot means less residue on the jar.
- Stronger scent consistency: The melt pool behaves more evenly, so fragrance releases in a steadier way.
That small cut before each lighting is one of the clearest answers to how to make candles last longer. It doesn't look dramatic, but it changes the burn from the start.
Ideal Burn Sessions and Why Longer Is Not Better

A candle that stays lit too long usually loses more than it gains. The wax gets hotter than it needs to, the melt pool deepens, and the wick starts working harder than it should. Health Canada's home fire safety guidance also fits that practical limit, keep an eye on the candle, never leave it unattended, and do not let it run on past the point of safe supervision (Health Canada home fire safety).
Why a 3 to 4 hour session usually works better
Once the top of the candle has reached a full melt pool, the session has done its job. Keeping it going after that usually adds heat, not value. You get a warmer jar, more soot risk, and a wick that can start mushrooming or burning less cleanly.
Canadian consumer guidance follows the same basic idea. Do not keep a candle burning for a long stretch, and stop before the container gets excessively hot. That is not fussy advice, it is the kind of habit that helps the candle stay in its normal burn range.
Fragrance behaves better in that same window. The early part of the burn usually gives the clearest scent. After the wick has been lit too long, the pool can deepen unevenly and the throw can start to flatten instead of improving.
What a realistic burn schedule looks like
As a workshop rule of thumb, I burn about one hour for every inch of candle diameter, then I put it out and let it reset. That keeps the melt pool even without turning the jar into a heat sink. It also gives the wick a cleaner next burn.
Shivora's documented 40 to 45 hour burn time for an 8 oz candle is a good real-world target when the wick is trimmed and the burn sessions stay sensible. Spread across regular home use, that is a normal candle life. Pushing one session too long usually burns through that life in a rougher way.
Why a longer session feels better than it is
A longer burn can seem efficient because the candle gives more scent at once. In practice, it often wastes fragrance, overheats the glass, and shortens the candle's useful life. Shorter sessions usually stretch the total burn farther.
For a fuller look at session timing, Shivora's guide to candle burn time is useful alongside this advice. The simple takeaway is steady care, not marathon burns, gives you more usable hours from the jar.
Cotton Wicks, Wood Wicks, and Wax Melts Compared for Longevity
Not every fragrance format protects burn time in the same way. Cotton wicks, wood wicks, and wax melts all solve a different problem, and the right choice depends on whether you want the longest jar life, the widest melt pool, or no flame at all. In soy wax, the wick usually matters more than the wax type when you're trying to stretch hours cleanly.
Side-by-side comparison
| Format | Approx. Burn Rate | Scent Throw | Maintenance | Best For |
|---|---|---|---|---|
| Cotton Wick | Steadier and slower when trimmed properly | Balanced and even | Trim before each burn | Everyday use, careful burners |
| Wood Wick | Slightly faster wax consumption | Broader, faster release | Needs regular trim and flame checks | People who like a wider melt pool and a crackling burn |
| Wax Melts | No open-flame burn, fragrance depends on warmer use | Repeatable fragrance from a warmer | No wick to trim | Homes that want scent without a flame |
What the trade-offs really feel like
Cotton wicks are the most forgiving if you like a predictable session and are willing to trim routinely. They usually support a calmer flame and slower wax consumption. Wood wicks behave differently, they can give a wider melt pool and faster fragrance release, but they also consume wax more quickly.
Wax melts solve a different problem. If you want fragrance without watching a flame, they remove wick care entirely. That doesn't make them “better” in every case, just easier for people who want repeatable scent with less maintenance.
A practical buying rule
If you want the longest candle life in a jar, start with cotton wick. If you care more about a broader melt pool and a bit more atmosphere, wood wick may suit you better. If you want scent without open flame, choose wax melts and let the warmer do the work.
I'd also point readers to testing cotton wicks for soy and paraffin if they want to see how wick construction affects performance in different waxes. It's a useful reminder that wick behaviour is not a side detail, it's the engine.
Fixing Tunneling, Soot, and Fading Scent Throw
Most candle problems look different on the surface, but they usually trace back to the same few causes. Once you know what to look for, the fix gets a lot faster. Tunnelling means the wax isn't melting to the edge, soot means the flame is misbehaving, and fading scent throw usually means the wick or melt pool isn't doing enough work anymore.
Tunnelling
A candle that tunnels is usually telling you the first burn was too short, the wick is too small, or both. The centre keeps melting while the sides harden into a rim of unused wax. A foil tent over the top can help redirect heat outward on the next burn, and a longer follow-up session often pushes the melt pool closer to the glass.
Check the wick position too. If it's off-centre, the candle will burn unevenly even when you do everything else right. That's one reason I keep a close eye on jar placement during production.
Soot
Black smudges on the glass or ceiling usually mean the flame is too tall, the room is too drafty, or the wick is too large for the jar. Trim the wick back to about 1/4 inch, move the candle away from vents and open airflow, and don't let the flame dance against a side wall. If the issue keeps returning on a new candle, the wick size may just be too aggressive for that vessel.
Fading scent throw mid-burn
When scent seems weaker halfway through a candle, I usually look at the wick tip and the melt pool diameter. A carbonised or mushroomed wick can choke the burn pattern, and a melt pool that hasn't reached full width won't release fragrance as evenly. Relight only after trimming, then give the candle enough time to rebuild a full melt pool.
Stopping the flame with a snuffer instead of blowing also keeps the wick cleaner for the next session. It's a small move, but it helps the next burn start in better shape.
If the candle is tunnelling, fix the melt pool. If it's sooting, fix the wick or the airflow. If the scent fades, fix the wick tip and the session length.
Storage, Drafts, and Room Placement That Protect Burn Time
A candle keeps changing after you bring it home. Soy wax softens in a warm kitchen, fragrance shifts in open air, and even where the jar sits between burns can affect how it performs the next time you light it. I tell customers to treat a candle like a product that stays active between burns, not something that resets itself on a shelf.
Storage that keeps the candle stable
Keep the lid on when the candle is not in use. Store it upright in a cool, dark place, away from strong smells and direct sun. That helps the wax hold its shape and keeps the fragrance from fading before you ever light it.
Many soy candle makers, including Shivora, treat 12 months as the practical window for peak fragrance in storage. I use that as a working freshness guide, not a hard expiry date. A candle can still be usable after that, but the scent may not feel as lively as it did when it was newer.
Drafts that shorten burn time
Room placement matters as much as the candle itself. Keep it away from HVAC vents, ceiling fans, open doors, and busy walkways. Those spots feed the flame unevenly, which can make the wax melt faster on one side than the other.
A window can be a mixed blessing. Some airflow helps indoor comfort, but a candle too close to a draft loses heat and fragrance balance. In smaller Canadian apartments, that shift shows up quickly because the air moves differently than it does in a larger room.
A steady room usually gives a steadier candle.
Winter first lights and spring condensation
Cold Canadian winters can make the first light sluggish. A chilly jar takes longer to build a clean melt pool, so I'll sometimes let the candle sit at room temperature before lighting rather than placing it near a cold window. Health Canada's candle safety guidance also points to keeping candles out of drafts and trimming the wick to about 1/4 inch before use, which lines up with the burn habits that help a candle last longer.
Spring brings its own issue. Condensation can form on lids and glass after temperature swings, so it helps to wipe the jar dry before storage.
If you want a room-specific example of how styling and placement work together, farmhouse candles at Farmhouse World is a useful reference for seeing how candles are often used as décor, not just scent.
The last bit of wax and the common questions
People ask why the last 1 to 2 cm of wax seems to disappear faster. The short answer is that the wick-to-wax ratio shifts as the jar empties, the remaining wax walls get thinner, and there is less fragrance mass left to support a full throw. That is normal, and it is also the point where some candles should just be retired. The same Health Canada safety guidance that covers wick trimming and draft control also warns against burning a candle all the way down if the vessel can no longer stay stable, and Quebec consumer safety guidance says candles should be burned for 1 to 2 hours at a time. That limit matches what I see in real use, especially with smaller jars that overheat if they are left going too long.
Scent fatigue can make a candle seem weaker mid-burn, especially in a room where you have been sitting for a while. That does not always mean the candle has failed. Sometimes your nose just settles in and stops noticing it as strongly.
Multi-wick candles need even more care. Light them together, trim them evenly, and let all the flames move in sync so one side does not race ahead of the other. If one wick is taller, it will pull the whole burn out of balance.
When the wax is nearly gone, I do not recommend chasing the very last bit forever. Keep burning only while the vessel stays stable and the remaining wax still has enough depth to feed the wick safely. Once the jar cannot support a clean burn, retire it, let it cool, and dispose of the leftover wax carefully.
The four habits that matter most are simple, trim the wick, avoid drafts, give the first burn enough time, and store the candle with the lid on.


