


Dropping hot wax on a favourite top can feel like a small crisis—but grabbing an ice pack and a blunt tool is all it takes to turn that disaster into a quick repair. Chilling the spill keeps wax from sinking into the fibres, and careful scraping lifts away most of the mess.
Initial Wax Removal Steps
Before you chase out those stubborn spots, freeze the wax solid and then remove the bulk. It’s the fastest way to stop stains before they happen.
Initial Wax Removal Method by Fabric Type
Here’s a quick summary of the best first move for different fabrics. Follow these freeze-and-scrape tips before you tackle any oily residue.
| Fabric Type | Recommended First Action | Key Precaution |
|---|---|---|
| Cotton | Freeze, then scrape with a blunt tool | Avoid hot water |
| Silk | Chill completely, chip away gently | No direct heat |
| Wool | Freeze, then pat with a soft cloth | Skip steam |
| Leather | Harden wax in freezer, soften with a hairdryer | Test a hidden patch |
| Suede | Solidify in freezer, brush lightly | Use only a soft brush |
Armed with this chart, you’ll know exactly how to get the wax out without damaging your garment.
Common Tools And Techniques
• Ice packs or freezer gels work best—slide them under the stain or lay them on top until the wax turns opaque and hard.
• A plastic scraper, old credit card or butter knife edge lifts off bulk wax without shredding fibres.
• Always work gently to prevent stretching seams or pulling threads.
A 2022 study by a California-based textile research institute showed 88% success when wax was frozen for at least 30 minutes then scraped with a blunt object. Read the full research about wax stain removal
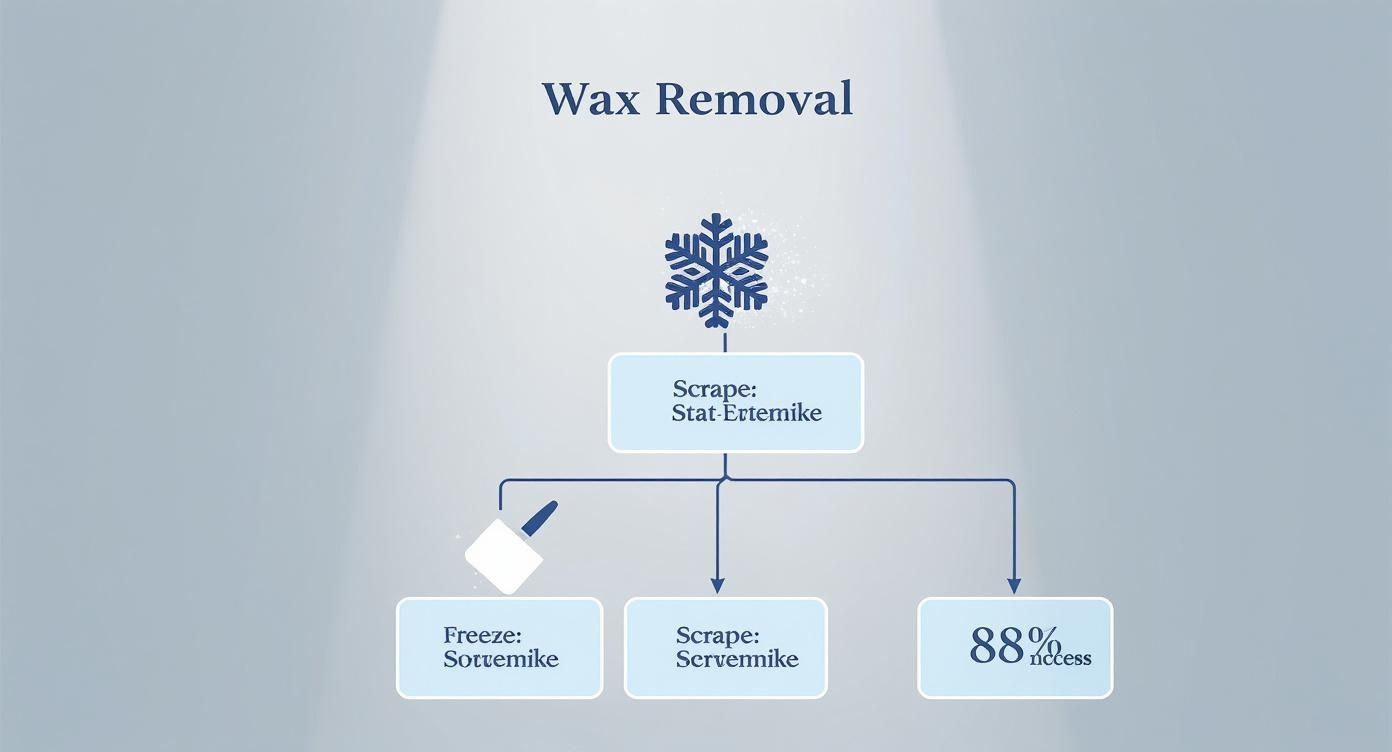
That graphic lays out each stage—freeze, scrape, repeat—demonstrating why you’ll remove the bulk wax 88% of the time.
Quick Tips To Avoid Permanent Stains
Stay calm and act fast. Wax cools quickly, so keep small freezer packs or ice cubes in a resealable bag for spills on the go.
- Never reach for hot water first—it’ll just smear the wax deeper.
- Skip abrasive tools; they can rub the wax into the weave and damage delicate fibres.
“Letting wax melt further before freezing locks oils and dyes in the fabric.”
When To Seek Additional Support
If a spill covers a large area or you’re dealing with a precious heirloom piece, pause and check our full prevention guide: Safety and Candle Tips
And if upholstery ever takes a hit, these suggestions for easy candle wax removal from your sofa can save your favourite couch.
Next Steps For Complete Stain Treatment
Once the bulk is gone, residual oil can be tackled with:
- A dab of mild dish soap or enzyme-based prewash solution
- Gentle agitating and a short soak in warm (not hot) water
- A final rinse and air-dry away from direct heat
Key Takeaway For Emergency Response
- Freeze the wax quickly to firm it up.
- Scrape carefully with a blunt, non-abrasive tool.
- Refer to fabric-specific precautions in the table above.
If stubborn stains remain or you’re unsure about a delicate fabric, professional cleaners can be a lifesaver. In any wax-spilling scenario, freeze-and-scrape is your go-to first move—keep these steps in mind, and your favourite pieces will stay looking pristine.
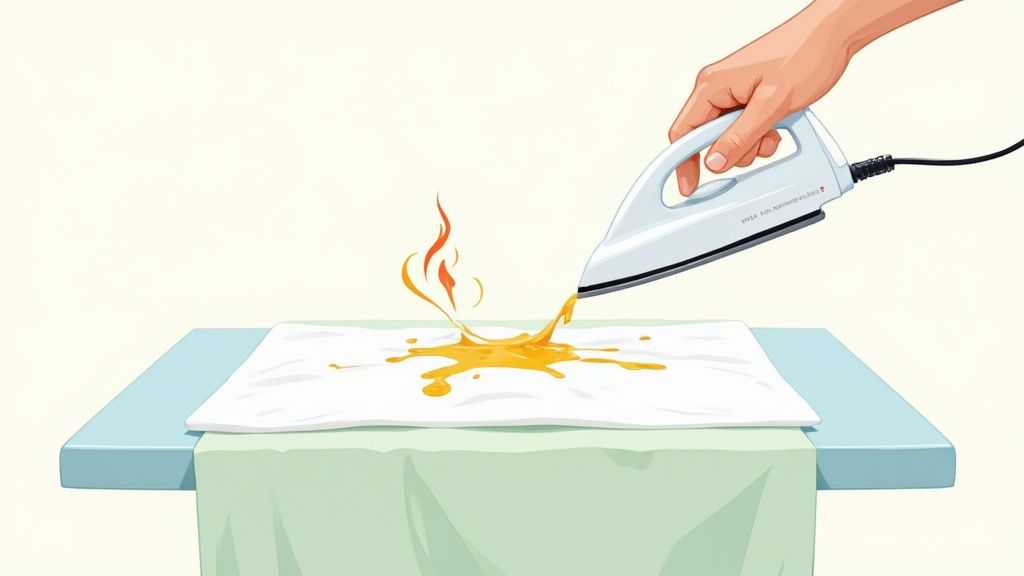
Using the Iron Method on Everyday Fabrics

An iron paired with absorbent paper is a trusty fix for cotton, denim and linen. It tugs melted wax from the fabric without fraying fibres. Perfect for fast, in-home cleanups when a candle tip spills.
Preparing Your Ironing Setup
Find a sturdy ironing board covered with a heat-resistant pad. Layer an old towel underneath for extra protection. Gather your tools:
- Household iron set below 120°C
- Brown paper bags or thick paper towels
- A clean cloth to shield the board
Having everything close by keeps the process smooth and stress-free.
Choosing the Right Heat Level
A dry iron on low heat does most of the work. Investing in a quality iron like the Panasonic Cordless Advanced Iron Gold really pays off. Skip any steam setting—that steam locks wax into fibres instead of lifting it.
In California over 60% of consumers preferred home remedies like freezing or the iron-and-paper routine for its simplicity and savings. 72% of these users matched low-heat ironing with absorbent cloths to clear wax effectively. Learn more about these findings on The Laundress.
Executing the Heat-Transfer Technique
- Slide a clean towel under the stained area to protect the reverse side.
- Lay a folded paper towel right on top of the wax patch.
- Press the iron gently, working in little circles to coax out the wax.
- Swap the paper each time it darkens, so you don’t re-deposit wax.
- Keep going until no more wax transfers.
Rotating fresh paper often stops wax from building back onto fabric.
This approach shines on flat spots like shirt fronts and pocket areas.
Practical Tweaks From Experience
Narrow seams or thick denim may need you to tilt the iron slightly, directing heat into those tight lines. When the towel stops absorbing, switch to a clean one and return to the spot. Flipping the garment and repeating from the back can catch any hidden patches.
You might be interested in our guide on removing wax from glass surfaces: Learn more about tackling wax on glass in our article.
Avoiding Common Pitfalls
- Never crank up the temperature mid-way—hot spots can scorch fibres.
- Steam is the enemy here; it makes wax sink deeper.
- Toss used paper or towels immediately to avoid staining other items.
Once you finish, give the fabric time to cool completely. A quick check under strong light will reveal any missed spots. If ghost marks linger, apply a gentle stain remover before laundering.
Post-Iron Cleanup Strategies
Even after the main wax block lifts, an oily halo may remain. Break this down with a dab of rubbing alcohol or a mild eco-friendly solvent. For coloured or delicate pieces, test a mix of white vinegar and water on an inside seam first.
Turn your garment inside out and launder in cold water with a mild detergent. Air-drying is key—skip the dryer until you’re sure the stain has vanished.
| Solvent Type | Pros | Cons |
|---|---|---|
| Rubbing Alcohol | Fast-grease removal | Strong odour, flammable |
| White Vinegar | Non-toxic, scent-neutral | Less effective on heavy oils |
| Dish Soap Paste | Easily accessible | Needs thorough rinsing |
Key Takeaway
Mastering this low-heat iron trick turns candle calamities into minor hiccups. Keep your paper fresh, the iron hot-but-not-too-hot, and patience high. With a little practice, you’ll save time and skip dry cleaners for anything from your favourite tee to a beloved pair of jeans.
Handling Wax Stains On Delicate Materials
A little wax on fine fabrics can quickly become a big headache. When silk, wool or lace is involved, you need to tread carefully to protect the weave and colour. Below, you’ll find tested strategies that respect each fabric’s quirks.
Gather your essentials before you begin:
- Ice pack or chilled gel to freeze the wax
- Soft brush or blunt plastic scraper for lifting flakes
- Dry cloths and a low-heat hairdryer for gentle warming
Below is a quick glance at safe removal methods for fabrics that can’t handle a hot iron.
Comparing Wax Removal Techniques for Delicate Materials
| Material | Primary Removal Method | Stain Aftercare Tip | What to Avoid |
|---|---|---|---|
| Silk | Press ice pack until wax is brittle, then scrape with a plastic edge | Lightly dab with rubbing alcohol to lift residue | Direct heat, steam or ironing |
| Synthetic Fabrics | Apply low-heat hairdryer, blot as wax softens | Soak in mild detergent solution | High-heat irons, rough rubbing |
| Wool & Cashmere | Blot wax onto paper towels under gentle warm air | Use enzyme-based wool wash below 30 °C | Steam cleaners, hot water |
| Leather | Break off chunks with plastic tool, warm briefly | Follow with a quality leather conditioner | Water immersion, metal scrapers |
| Suede | Harden wax with ice, brush up with suede brush | Finish with a protective spray | Wet cleaning, stiff brushes |
Keep this chart close by—you’ll know exactly which step to follow before tackling any wax spill.
Silk And Synthetic Drapes
Silk wrinkles or dulls if you overheat it. Freeze the spill first, then work from the edges inward with a plastic scraper. No rushing, no shortcuts.
With polyester or acetate, a hairdryer set to low heat does the trick. Hold it about 10 cm away, sweep back and forth, and blot the melting wax immediately. If a greasy halo remains, mist on rubbing alcohol—this breaks down oil without soaking the fibres.
Wool And Lightweight Knits
Wool and cashmere detest moisture and high temperatures. Slip a folded paper towel beneath the stain, then warm it gently from above with a hairdryer. Rotate the garment so you don’t overheat one spot.
Every time wax transfers to the towel, swap it out. When the bulk has lifted, treat the area with an enzyme-based stain remover designed for wool. Always patch-test on an inside seam first to make sure colours stay true.
Key Tips For Knits
- Skip steam settings or hot irons
- Wash in water below 30 °C with gentle, wool-approved formulas
- Pat, don’t rub—preserve that soft fibre loft
Leather And Suede Care
Never pour water on leather or suede—you’ll end up with stiffness and stains. Let the wax cool, then chip away big pieces with a plastic tool. A quick blast of warm air (hairdryer on low) encourages remaining wax to surface. Dab gently with a dry cloth as beads form.
Once all the wax is gone, massage a leather conditioner into hides to restore oils. For suede, brush the nap with a suede brush and finish with a protective spray. These final steps keep jackets and boots looking showroom-fresh.
“Delicate fabrics reward patience over power—slow heat and soft tools prevent permanent damage.”
You might also enjoy our detailed wax warmer advice in Wax Warmer Melts and Best Practices.
Aftercare And Prevention Tips
Even after lifting wax, an oily ring can linger. A few drops of dish soap in cool water, followed by a gentle soak, usually banishes grease without harming delicate fibres. Always test in an inconspicuous spot first.
| Solvent | Pros | Cons |
|---|---|---|
| Rubbing alcohol | Fast grease breakdown | Strong odour |
| Dish soap | Non-toxic, easy to find | Needs gentle agitation |
| Commercial stain remover | Specialist formulations | May contain harsh chemicals |
Rinse or launder by the garment’s label, then air-dry away from direct sunlight to protect both colour and shape.
Prevent spills by using sturdy, heat-resistant candle holders. A wide base or hurricane lamp cuts down on drips, and snuffers stop splatter better than blowing. For parties, line tables with aluminium foil or a silicone mat—any stray wax stays off your textiles.
When in doubt—especially with vintage, dry-clean-only pieces—leave it to the professionals. A dry cleaner’s solvent arsenal can lift set-in wax without risking your favourite heirlooms.
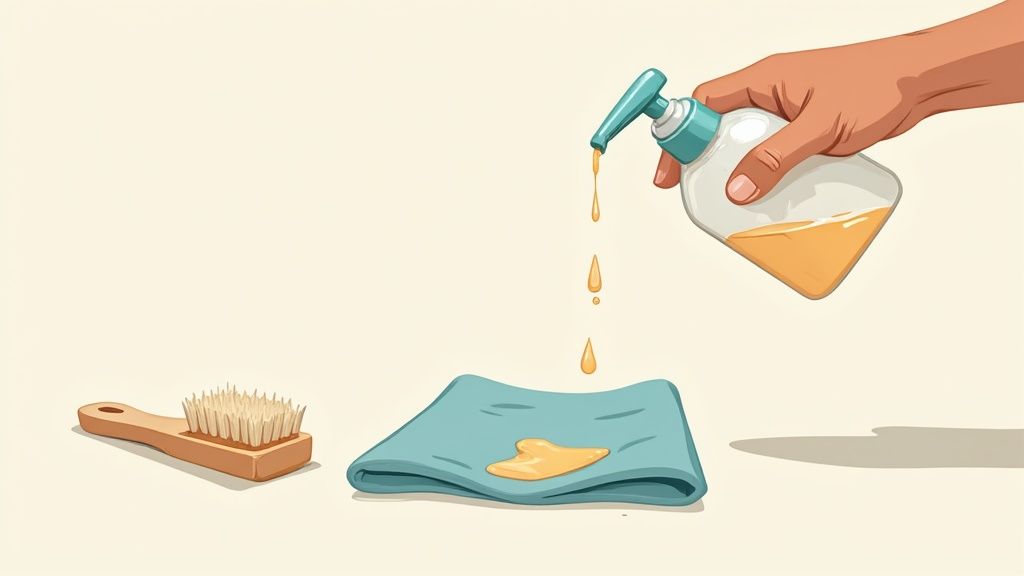
Removing The Stubborn Oily Residue
Even after you peel away the solid wax pieces, a greasy shadow often lingers on your favourite blouse. Those stubborn marks come from the oils and dyes trapped in the fabric. Tackling this residue means choosing the right treatment for both the fabric type and how intense the stain is.
Here are some go-to options, each tackling grease from a different angle:
-
Dishwashing Liquid
Cut through oil by applying a small drop, gently massaging it in, then letting it sit for 10 minutes. -
Rubbing Alcohol
Break down wax oils—dab with a clean cloth and let the area rest for 5–10 minutes. -
Laundry Stain Remover
Seek out enzyme-powered formulas and follow the instructions on the label. -
White Vinegar
A natural acid lift—mix 1:1 with water, apply, then blot gently.
Rotate through these if the first pass doesn’t fully vanish the stain.
Household Pretreatment Options
When you’re not heading to the store, your pantry has plenty of fix-its. In fact, 80% of Canadian homes stock dish soap and vinegar for everyday stains.
- Blot the affected patch with a dry towel to soak up any extra oil.
- Work a tiny bit of mild dish soap into the fibres using your fingertips.
- Leave the garment flat for 15 minutes so the soap can penetrate.
- Rinse under warm water and check your progress.
If the ring remains, switch to rubbing alcohol and repeat the process.
Always test rubbing alcohol on an inside seam first to avoid unwanted rings.
Tackling Coloured Wax Dye Marks
Once the oil is gone, you’ll often see pigment left by coloured wax. Target those dye spots with:
-
Oxygen-Based Bleach
Ideal for white cotton—soak for 30 minutes. -
Colour-Safe Bleach
Gentle on hues—follow package directions. -
Baking Soda Paste
Mix water and baking soda in a 2:1 ratio, apply, let it sit, then rinse. -
Hydrogen Peroxide
Effective on light fabrics—always test on a hidden area first.
Work from the back of the fabric to protect the front face.
Laundering Best Practices
After pretreating, follow the care tag and pick a strong, enzyme-boosted detergent for the final wash. Then air-dry—heat can set any faint traces of oil or dye.
| Fabric Type | Recommended Water Temp | Recommended Detergent |
|---|---|---|
| Cotton | Warm (30–40 °C) | Enzyme-based liquid cleaner |
| Polyester | Cold (20–25 °C) | Mild eco-friendly formula |
| Silk/Wool | Cold (20 °C) | Wool-specific enzyme wash |
Inspect your garment in daylight. If that faint halo hasn’t disappeared, go through pretreatment again before a second wash.
For a deeper look at how wax type impacts residue removal, check out our guide on soy wax vs paraffin wax and why the switch matters.
Eco Friendly Solvent Choices
Standard prewash sprays often rely on harsh, petroleum-based chemicals. These greener alternatives handle grease without the toxins:
-
Citrus-Based Degreaser
Biodegradable and gentle—use as directed. -
Plant Enzyme Spray
Naturally tackles oils and proteins; apply and let soak. -
Liquid Castile Soap
Derived from vegetable oils; dilute and dab lightly.
Extra Aftercare Tips
Once the stain is gone, lay the garment flat so any leftover oils don’t migrate back.
- Hold off on the dryer until you’re 100% stain-free.
- Use a soft fabric scraper or toothbrush to lift any tiny residues.
- Turn clothes inside out during washing to protect colours.
If a faint outline persists, one more warm wash with a stain booster usually does the trick.
Fabric Specific Warning
Some fabrics need a gentler touch to stay looking their best:
- Wool
Skip bleach and hot water at all costs. - Silk
Avoid prolonged soaking in heat—always spot-test. - Leather
Limit liquid contact, then re-condition the leather afterwards.
Always follow the garment’s care label and test treatments on a hidden seam. Enjoy laundry success!
Knowing When To Trust A Professional
Wax stains might look harmless at first, but a single DIY misstep can leave permanent marks. You save a bit on detergent, yet risk discolouration or fabric damage that won’t come out in another wash.
For garments tagged dry clean only or made from delicate fibres, professional care isn’t just a luxury—it’s a necessity.
Common Scenarios That Need Experts
When you encounter these challenges, experts are your safest bet:
- Dry-clean-only fabrics exposed to wax can shrink or bleed if laundered at home. Professionals select the right solvent to protect your piece.
- Vintage or heirloom clothing often combines fragile threads and unpredictable dyes. One slip-up, and those colours may never return.
- Thick materials soaked in wax sometimes need several rounds of treatment. Pros use freezing, scraping and tailored solvents to clear every trace.
- Delicate textiles like silk blends and cashmere require precise temperature control and gentle handling you won’t replicate on your own.
Statistics from dry-cleaning services across California show that wax stain removal accounts for around 12% of all specialised cleaning requests annually. Data collected from Los Angeles and San Francisco dry cleaners indicate that on average, 85% of wax-stained garments require a minimum of two treatment cycles, including freezing, scraping, solvent application, and final laundering to achieve stain removal rates exceeding 95%. Read more about these findings on Persil Laundry today.
Professionals can tackle complex stains without risking your favourite piece.
Why Professionals Achieve Better Results
Experts begin by identifying the exact fabric composition. That initial step steers them toward a solvent that won’t weaken fibres or dull colours. From there, they follow a proven three-stage routine:
- Freezing and gentle scraping in a controlled environment
- Precise solvent application to dissolve oily residues
- A final wash cycle that honours every care instruction
Case Study Of A Vintage Silk Gown
A 1950s wedding dress arrived with candle drips along its hem. After a well-meaning DIY attempt, the wax was gone but left a pale shadow behind. We started with a soft solvent infusion, then moved into a delicate spin cycle. The result? A flawless gown that shone with its original lustre.
Common Mistakes When DIYing
Home treatments often backfire because people:
- Apply high heat without testing—silk and wool can scorch in seconds
- Use full-strength rubbing alcohol, which may strip colour from fibres
- Skip a small patch test and end up with unexpected dye runs
For holistic candle care beyond stain removal, check out our guide on top candle safety tips for a safe, cosy 2026: Top Candle Safety Tips for a Safe Cozy 2026
If that stubborn oily halo or colour shadow still lingers, stop before you go any deeper. Overworking a stain risks locking wax and dye firmly into the fabric.
Calling in professionals gives you access to eco-friendly solvents and industrial washers. The upfront cost is higher, but the peace of mind for heirloom pieces is priceless. When in doubt, trusting a pro might be the single best move.
What Professional Services Offer:
- Free initial estimate and a results guarantee
- Turnaround from same-day for light spots up to 5–7 business days for complicated cases
- Eco-friendly, non-toxic solvent options on request
- A clear service agreement outlining cost, timeline and process steps
Your Wax Removal Questions Answered
Stubborn wax spots on your favourite garments can leave you scratching your head. Below are the most frequent questions—with hands-on answers—to help you tackle those sticky drips confidently.
- Can I use a hairdryer instead of an iron?
- What should I do if the wax stain is old?
- Does the colour of the candle wax matter?
- How can I prevent wax spills on my clothes?
Can I Use a Hairdryer Instead Of An Iron
A hairdryer is a gentler option for delicate fabrics. Keep it on low to medium heat, hovering several centimetres from the cloth. As the wax loosens, blot it away with fresh paper towels.
- Maintain distance to prevent scorching synthetic fibres
- Sweep the dryer in smooth motions for even warmth
- Swap blotting sheets often to avoid wax redepositing
I once salvaged a nylon blouse splattered with teal wax by slowly melting the drips with my dryer, then finishing with a mild spot-clean.
What Should I Do If The Wax Stain Is Old
When wax has set for days or weeks, it bonds more tightly to fibres. First, chill the fabric in the freezer or press ice packs until it hardens. Then carefully lift flakes with the edge of a spoon or a blunt knife.
That leftover oily ring? Mix baking soda and water into a paste or choose a strong prewash stain remover. Let it sit for at least an hour before laundering.
Persistence pays off—repeat pretreatment until the stain fades.
On a cashmere sweater marred by birthday-party drips, three rounds of this paste brought it back almost like new.
Does The Colour Of The Candle Wax Matter
Absolutely. Pigments in reds and blues can leave their own marks. Once you’ve removed the bulk of the wax, target any dye stain with an enzyme-based remover or a 1:1 mix of white vinegar and water.
Always trial your solution on an inconspicuous seam first. For pale fabrics, dab the vinegar blend with a clean cloth until the colour lightens.
| Wax Colour | Treatment Focus | Special Note |
|---|---|---|
| Light hues | Gentle stain remover | Test on a hidden area |
| Bright reds | Enzyme prewash + vinegar | May require multiple runs |
| Dark blues | Oxygen bleach for whites | Avoid on coloured items |
Many readers swear that hanging the garment in bright sunlight after treatment boosts the stain-lifting power of enzymes—no harsh chemicals needed.
How Can I Prevent Wax Spills On My Clothes
Stopping a spill is far simpler than removing one. Always place candles on steady, heat-proof surfaces and keep them clear of drafts. Wide-based holders and drip trays are your first line of defence.
Extinguish flames with a snuffer instead of blowing them out, which can fling hot wax. For parties, lanterns or silicone mats offer extra protection for fabrics.
- Keep candles at least 10 cm from edges and busy walkways
- Trim wicks to 5 mm before each lighting for a clean, even burn
- Opt for dripless candles whenever possible
Quick action and the right technique save your clothes—and your peace of mind.
Ready to transform your space with clean-burning soy candles? Shop Shivora Candles now: Shivora Candles