


That sinking feeling when a drop of candle wax lands on your favourite sweater is all too familiar. But it doesn't have to be a disaster. The secret to getting wax out of fabric isn't some magic formula; it's about choosing the right first move: do you use cold to make the wax brittle enough to scrape off, or use heat to melt and lift it away? The fabric itself will tell you which path to take.
Your First Move for Any Wax Stain
When a wax spill happens, the urge is to wipe it up immediately. Fight that instinct! Rushing in while the wax is still hot will only smear it and push it deeper into the fibres, making your job ten times harder.
The first, and most important, step is to just let it be. Wait for the wax to cool and harden completely. Once it's solid, you can figure out your game plan. It really comes down to two opposing techniques: freezing it or melting it.
Heat vs. Cold: A Quick Breakdown
- The Freeze Method: This is your go-to for tough, sturdy fabrics like denim or canvas. Popping the item in the freezer or applying an ice pack makes the wax so brittle it often just cracks and flakes right off the surface. It’s surprisingly effective and leaves very little residue behind.
- The Heat Method: This is the classic trick that works wonders on everyday fabrics like cotton and linen. It involves using a warm iron and something absorbent—like a paper towel or a plain brown paper bag—to gently melt the wax and draw it out of the fabric.
Picking the wrong method can cause real problems. A hot iron on a delicate synthetic, for example, could melt the fabric itself. On the other hand, trying to aggressively scrape hardened wax from a fragile silk blouse might snag or tear the material. Safety is everything, both for your clothes and your home. For a refresher on handling candles safely, take a look at these essential candle safety tips for a cozy, accident-free environment.
This decision tree gives you a clear visual on which way to go.
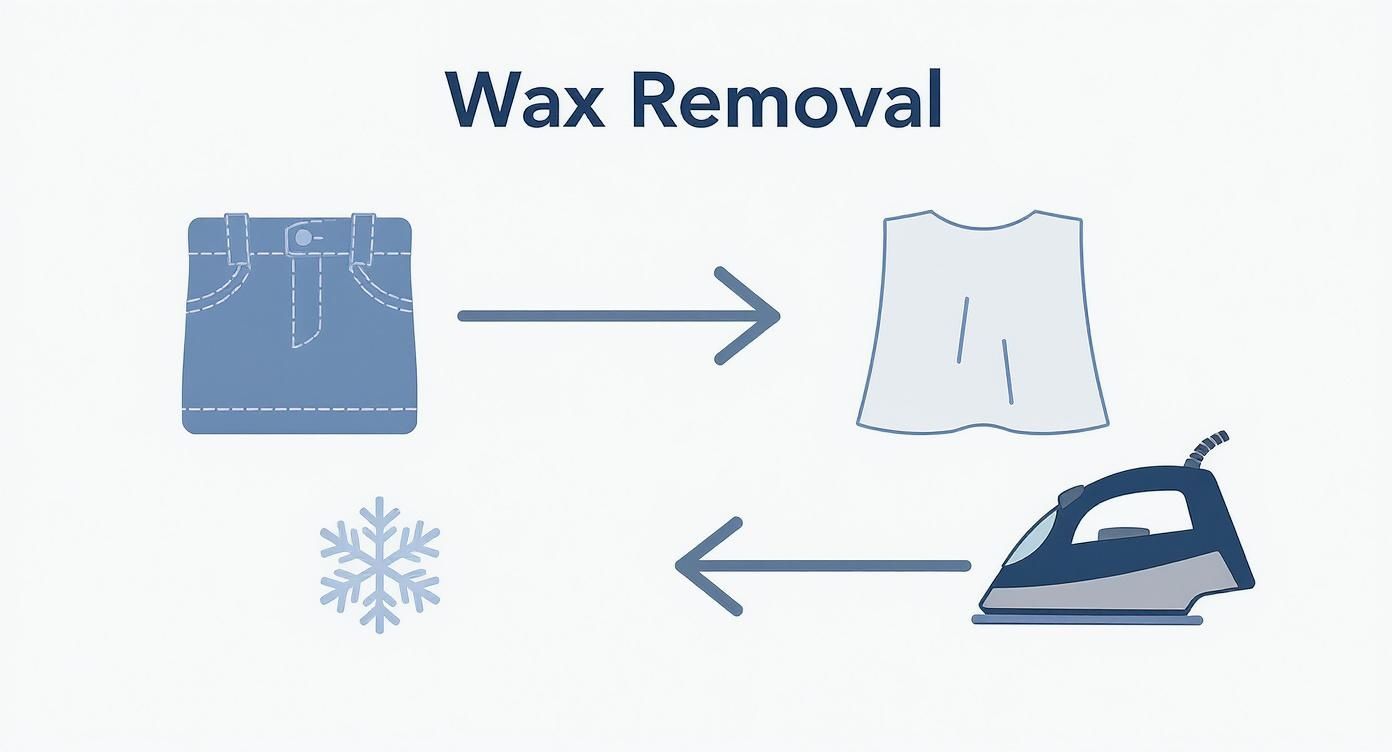
As you can see, the tougher the fabric, the better it responds to the freeze-and-scrape method. More common or delicate materials need a gentler touch with controlled heat.
Making the Right Choice
To make things even simpler, here’s a quick guide to help you decide what to do in the moment.
Quick Guide: Which Method to Use for Your Fabric
This table breaks down the best initial approach for common fabrics you'll encounter. Think of it as your first-response cheat sheet for wax spills.
| Fabric Type | Recommended First Action | Key Consideration |
|---|---|---|
| Denim, Canvas, Corduroy | Freeze & Scrape | These tough materials can handle scraping without fraying. |
| Cotton & Linen Blends | Heat & Absorb (Iron) | The fibres can withstand low to medium heat without damage. |
| Wool, Silk, Synthetics | Gentle Heat (Hairdryer) | A hot iron is too aggressive; controlled, lower heat is safer. |
| Upholstery & Carpet | Freeze & Scrape, then Heat | This two-step process tackles surface wax before addressing residue. |
By taking a moment to identify your fabric and choose the right starting point, you give yourself the best chance of success. It’s the difference between a minor cleanup and a permanent stain that sends another good piece of clothing to the donation pile.
The Freeze and Scrape Method for Sturdy Fabrics
When you're dealing with tough, tightly-woven fabrics like denim, canvas, or even a heavy cotton twill, your first thought might be to melt that wax right off. But hold on—applying heat can actually work against you here, pushing the wax deeper into the fibres and setting the stain for good.
This is where a little bit of cold science becomes your best friend. The freeze-and-scrape method is my go-to for these kinds of materials. By making the wax ice-cold, you make it brittle. This simple trick breaks its grip on the fabric, letting you just flake it away. It’s a surprisingly effective first strike against a waxy mess.
Getting it Cold
First things first, we need to get that wax properly frozen. You’ve got a couple of easy options. The simplest is to just fold the item with the wax stain facing out and pop it in the freezer. Give it a good 30 to 45 minutes to make sure the wax is frozen solid all the way through.
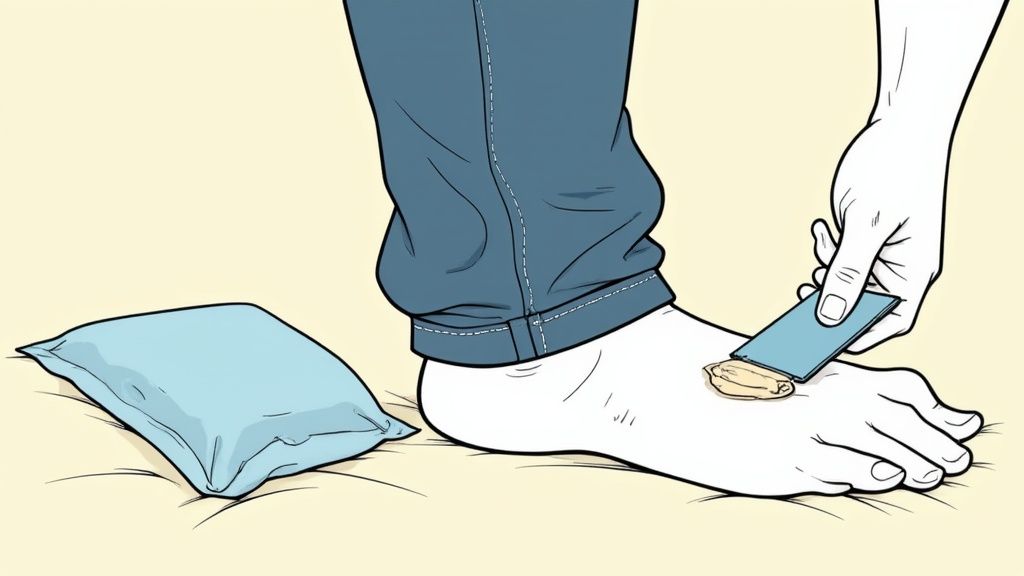
What if the item is too big for the freezer, like a heavy jacket or a canvas carry-all? No problem. Just grab an ice pack or a plastic bag full of ice cubes. Press it directly onto the wax stain until it's hard as a rock. Make sure the bag is sealed tight—the last thing you want is to trade a wax stain for a water spot.
Pro Tip: Don't be tempted to cut the freezing time short. The colder and more brittle that wax gets, the cleaner the break will be. A little patience now saves a lot of scraping later.
The Scrape-Off
Once the wax is completely hardened, it’s time to remove it. You’ll want a tool with a dull, firm edge that can lift the wax without snagging or cutting the fabric. Steer clear of anything too sharp, like a razor blade, which can easily cause damage.
A few everyday items work perfectly for this:
- A credit card: The edge is just right for getting under the wax and flicking it off.
- A dull butter knife: Its rounded tip is great for prying up larger, thicker chunks.
- The edge of a spoon: This is surprisingly handy for textured fabrics like corduroy, helping you get the wax out of the grooves.
Start at the edge of the wax spill and apply gentle, firm pressure to pop the pieces off. You’ll likely hear a satisfying crackle as the frozen wax shatters and lifts away. Keep working your way across the stain until all the surface wax is gone. Of course, preventing spills is always ideal, and good candle care goes a long way. Using the right tools, like a proper candle wick trimmer, helps your candles burn more cleanly and reduces the chance of drips.
After you've scraped away all the solid bits, you'll probably still see a faint, oily patch. That's perfectly normal—it's just the residue left behind. The next steps will walk you through how to tackle that lingering spot and get your fabric looking good as new.
Using Heat to Lift Wax from Everyday Fabrics
For sturdy fabrics like cotton, linen, and many of their durable blends, the old-fashioned iron-and-paper-towel trick is a classic for a reason—it just works. This heat transfer method is your best bet when freezing the wax off isn't practical. It gently melts the wax, letting an absorbent material wick it right out of the fibres.
The logic is straightforward: heat turns the solid wax back into a liquid, and the paper acts like a sponge. It’s a bit of a delicate balance, though. If the iron isn't hot enough, the wax won't melt. But too much heat, and you risk scorching your favourite tablecloth or blouse.
Setting Up for Success
Before you even think about plugging in the iron, getting your station ready is the key to a clean result. Start by laying an old, clean towel over your ironing board. This protects its surface from any wax that might sneak through the fabric.
Next, gather your simple toolkit. You don't need anything fancy.
- An iron with adjustable heat. This is crucial: make sure the steam function is switched off. Steam adds moisture, which gets in the way of the wax absorption and can actually set the stain.
- Absorbent paper. A plain brown paper bag (no print or waxy coating), basic paper towels, or even blotting paper will do the job perfectly.
With your materials ready, lay the stained section of the fabric flat on your protected ironing board.
The Heat Transfer Process
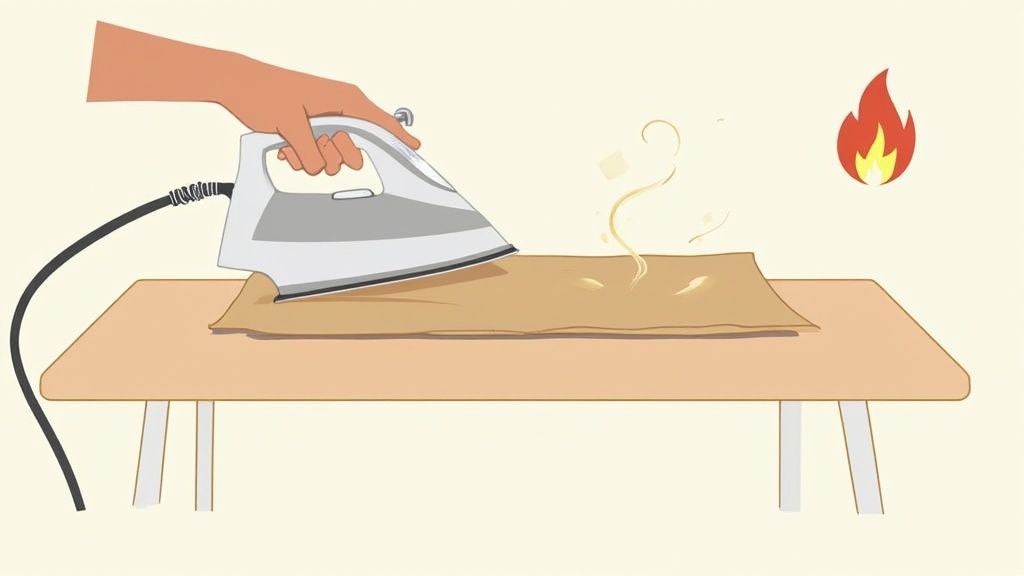
It’s time to make a little "wax sandwich." Place one piece of your absorbent paper under the stain and another on top of it. This ensures you're drawing the melted wax out from both sides of the fabric for a more thorough removal.
Set your iron to a low-to-medium heat. I always suggest starting with the recommended setting for the fabric type, but err on the cooler side. You can always turn it up if needed. Gently press the warm iron onto the top paper for just a few seconds at a time.
You'll see a dark, oily spot appear on the paper as it soaks up the melted wax—that's how you know it's working. Lift the iron, check your progress, and reposition the paper to a clean, dry section.
My Pro Tip: The goal is to always have a fresh patch of paper touching the wax. If you keep pressing over an already saturated spot, you’re just pushing the oily wax back into the fabric. Keep repeating the press-lift-reposition process until the paper comes away clean.
While this heat method is a star player, a multi-pronged attack often delivers the best outcome. Many cleaning experts swear by a combined approach. For instance, home-care surveys in California show that a combined method of freezing, scraping, heat application, and proper laundering has a success rate of over 75% on common household fabrics. Thinking about the whole process, from start to finish, will give you the best shot at tackling even the most stubborn spots.
Handling the Oily Aftermath
Even after all the solid wax is gone, you'll probably see a faint, greasy shadow left on the fabric. This is the oily residue that all wax—especially paraffin-based candles—leaves behind. Don’t panic! This is completely normal and easy to treat.
To get rid of that greasy mark, dab a small amount of a grease-fighting liquid dish soap directly onto the area. Gently work it into the fibres with your fingers and let it sit for 15-20 minutes. The soap gets to work breaking down those stubborn oils, prepping the item for the wash.
After the pre-treatment, launder the garment as you normally would, following the care label. Use the warmest water the fabric can safely tolerate to help dissolve any remaining oil. Critically, let the item air-dry afterwards. Tossing it in a hot dryer can permanently set any residue that might still be hiding. If you've had a wax mishap on other surfaces, a similar melt-and-wipe technique can work wonders; our guide on how to remove candle wax from glass has some great tips for that.
A Gentle Approach for Delicate and Synthetic Fabrics
When a drop of wax lands on silk, wool, or a sensitive synthetic like rayon, your first instinct to grab a hot iron is the wrong one. These materials just can't handle that kind of direct, intense heat. An iron press will almost certainly lead to irreversible scorching, melting, or discolouration. To save your most treasured garments, you need a much more controlled, gentle touch.
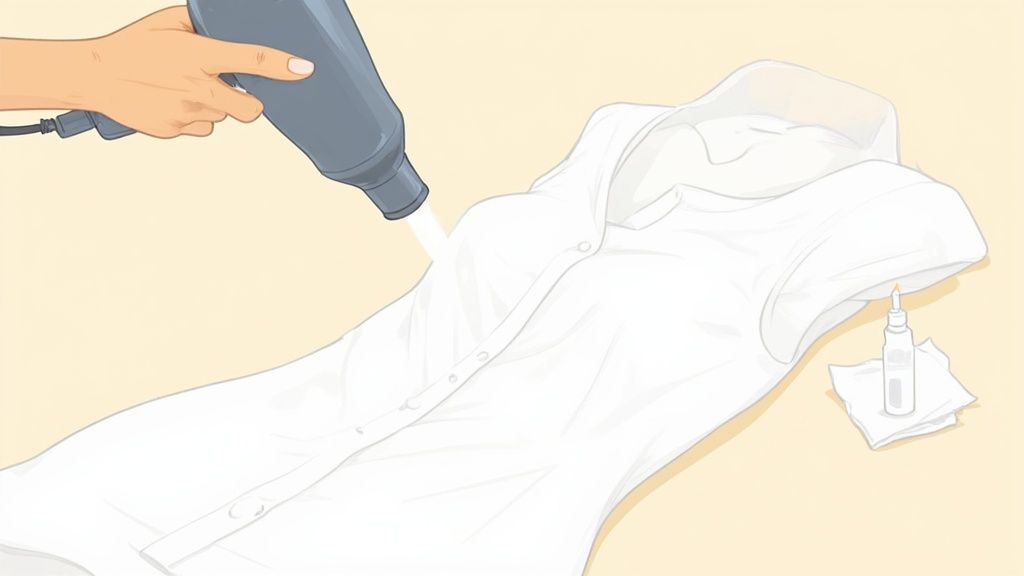
This is where a simple hairdryer becomes your secret weapon. It provides a lower, more diffuse heat that you can easily manage, dramatically cutting the risk of damaging those fragile fibres. The goal is the same—liquefy the wax so you can blot it up—but the execution is far more delicate.
The Hairdryer Method
Start by creating a "wax sandwich." Place a clean, white paper towel or a piece of a plain brown paper bag under the stained area and another piece on top. This setup is crucial for absorbing the melting wax from both sides of the fabric.
Switch your hairdryer to a low or medium heat setting. Hold it a good few inches away from the fabric and move it in a slow, continuous circle over the paper towel. This keeps any single spot from overheating. It won't take long before you see an oily patch appear on the paper—that's the wax being drawn out of the fibres.
Once the paper towel is saturated, swap it out for a fresh one. Keep repeating the process of gently heating and blotting until the paper comes away clean. This technique works especially well for materials with a natural sheen, like silk or satin, as it helps preserve their beautiful lustre.
Using Solvents for What's Left Behind
Sometimes, even after the hairdryer trick, a faint waxy feel or a hint of colour remains. This is the time to bring in a solvent. Isopropyl alcohol (rubbing alcohol) is fantastic for breaking down those last stubborn traces of wax and any dye that came with it.
The Golden Rule of Solvents: Always, always do a spot test first. Dab a tiny bit of the solvent on a hidden area, like an inner seam or hem, using a cotton swab. Let it dry completely. If you don't see any colour change or damage, you're good to go.
To tackle the stain, lightly dampen a clean, white cloth with isopropyl alcohol. Gently blot the spot; whatever you do, don't rub. Rubbing can easily damage delicate fibres, causing them to pill or fray, and it can actually spread the stain. The blotting motion is designed to lift the residue straight out of the fabric and onto your cloth. Continue blotting with clean sections of the cloth until the stain vanishes. For larger items that need extra care, like a delicate couch, you might pick up some valuable tips in a guide on how to clean your couch upholstery like a pro.
Key Tips for Delicate Fabrics
Working with delicate materials is all about patience and a light hand. Keep these points in mind for the best possible outcome.
- Patience is a Virtue: Rushing is the surest way to cause damage. Work slowly, especially when applying heat or solvents.
- Blot, Don't Rub: This is the most important rule. Rubbing just grinds the wax deeper and can permanently ruin the texture of fabrics like wool or silk.
- Keep it Cool: Always stick to low or medium heat on your hairdryer and never hold it too close to the garment.
- Read the Label: Before you do anything, check the garment's care tag. If it says "Dry Clean Only," your best bet is to hand it over to a professional.
Dealing With Lingering Colour Stains and Oily Marks
Getting the solid wax off is a great first step, but you're not quite out of the woods yet. More often than not, a stubborn reminder of the spill is left behind—either a faint, greasy patch or a colourful dye stain from the candle. This final cleanup is what really brings your fabric back to life.
These leftover marks need a different game plan. The bulk of the wax is gone, but the oils and pigments that gave it its character have now seeped deep into the fabric fibres.
Banishing Bright Dye Stains
We love a colourful candle, but those beautiful dyes can leave a surprisingly tenacious stain. When you're looking at a spot of red, blue, or purple, you need a targeted treatment to break down that pigment without damaging the fabric itself.
A fantastic and readily available tool for this is isopropyl alcohol, also known as rubbing alcohol. Before you go all in, always do a quick spot test on an inside seam to make sure it doesn't mess with the fabric's colour. Once you get the green light, dampen a clean, white cloth with the alcohol and gently blot the stain. Whatever you do, don't rub! That'll just spread the dye and can rough up delicate fibres. Blotting helps lift the pigment out of the fabric and onto your cloth.
Alternatively, a good-quality commercial stain remover is another excellent option. Just apply it directly to the stain and let it sit for the recommended time, usually about 10-15 minutes, before you head to the washing machine.
Defeating That Greasy Residue
Almost every candle wax, from standard paraffin to natural alternatives, has an oily base. This is what causes that classic translucent, greasy spot that sticks around after the hard wax is gone. Water alone won't touch it; you need something that can actually break down and lift the oil away.
Your secret weapon is probably already under your kitchen sink: a good, grease-fighting dish soap. Its formula is literally designed to cut through grease and oil.
Expert Tip: Put a few drops of undiluted dish soap right on the oily patch. Gently work it into the fibres with your fingers, making sure the whole area is covered. Let it sit for at least 20 minutes to give the soap time to do its thing.
This simple pre-treatment is a game-changer. It’s what stops that shadowy stain from becoming a permanent fixture after a wash. If you’re dealing with a particularly stubborn spot on furniture, you can learn more about how to clean upholstery stains from professionals who see this stuff every day.
The Final Wash and The All-Important Drying Step
After pre-treating for dye and oil, your item is ready for the wash. First things first: check the care label. For durable fabrics like cotton, use the warmest water the material can safely handle to help dissolve any last bits of residue. For delicates, stick to a cool or warm cycle.
The type of wax can also make a difference here. For instance, soy wax is much softer and has a lower melting point, which often makes its oily residue easier to tackle. If you're curious about the specifics, our soy wax vs. paraffin wax blog post breaks down why the composition matters.
Once the wash cycle finishes, do not put the item in the dryer. I can't stress this enough—it's the most critical rule of the entire process. The intense heat from a machine dryer will permanently set any faint trace of oil or dye you might have missed while the fabric was wet.
Always air-dry the item completely first. When it’s dry, take a close look at it in good, natural light. If you see even a hint of the stain, just repeat the pre-treatment and wash it again. Only when you are 100% certain the stain is completely gone should it ever see the inside of a dryer.
Post-Wax Removal Laundry Guide
After you've scraped, frozen, or heated the wax off and pre-treated any leftover spots, this table will guide you through the final laundry phase.
| Fabric Type | Recommended Water Temperature | Pre-Treatment for Oily Residue | Drying Method |
|---|---|---|---|
| Cotton & Linen | Hot (as per care label) | Grease-fighting dish soap | Air-dry first, then machine-dry once stain is gone |
| Synthetics (Polyester, Nylon) | Warm | Grease-fighting dish soap or stain remover | Air-dry completely before considering low-heat dryer |
| Wool | Cold or Lukewarm | Wool-safe detergent, gently worked in | Air-dry flat, away from direct heat or sun |
| Silk | Cold | pH-neutral dish soap or silk-specific cleaner | Air-dry away from sunlight |
| Upholstery (Spot Clean) | Cold water with solvent | Upholstery cleaner or diluted dish soap | Blot dry with a clean cloth, then air-dry |
This final wash is your last line of defence, ensuring no trace of the wax spill remains. Remember to always check the results after air-drying before you ever apply heat.
When to Trust a Professional Dry Cleaner
https://www.youtube.com/embed/h9I-xqd8QlU
While most wax spills are a bit of a nuisance you can handle at home, some situations are best left to the experts. Knowing when to wave the white flag isn't a sign of defeat; it’s the smartest way to save a garment you truly care about from a DIY disaster.
Sometimes, the fabric makes the decision for you. If you see a "Dry-Clean Only" label staring back at you, that’s your cue. Don't even think about trying to fix it yourself—it's a recipe for shrinking, discolouration, or worse.
Scenarios That Demand a Professional Touch
It's time to head to the dry cleaner when you're dealing with any of the following:
- Delicate or Tricky Fabrics: Think suede, leather, fur, velvet, and some very fine silks. These materials are notorious for reacting badly to heat, water, and home remedies. A professional has the right solvents and, more importantly, the know-how to treat them without causing damage.
- Large or Deeply Set Spills: If a big candle tipped over and saturated a huge patch of your couch or favourite coat, you're facing a much bigger battle. Professionals have the specialized equipment to tackle that sheer volume of wax, something that's nearly impossible to manage effectively at home without making a bigger mess.
- Priceless or Sentimental Items: When it's your wedding dress, a vintage jacket from your grandmother, or that designer piece you saved up for, the risk is just too high. Let someone with insurance and years of experience handle it.
The real advantage a pro has is their arsenal of controlled, specialized solvents. They use chemicals that can dissolve wax and oily residues without harming delicate fibres—a trick that heat or household products simply can't pull off safely.
The Professional Advantage
Dry cleaners bring a level of expertise you just can't replicate with a quick online search. They can look at a stain and know exactly what kind of wax and dye they're up against, then choose the perfect solvent to break it down without stripping the fabric's colour or ruining its texture. This is especially critical for antique or complex textiles.
And believe me, they see this all the time. Wax stain removal is one of the more common requests textile specialists get. In fact, data from Canadian dry-cleaning services shows that around 12% of all specialized jobs involve getting wax out of something. That number alone shows just how often people turn to the pros for a solution. You can actually find out more about wax stain statistics in Canada to see how common this problem is.
Learning to handle a wax spill is a fantastic skill, but so is knowing your limits. For a delicate fabric, a massive mess, or an item you can't bear to lose, trusting a professional is always the right call.
A Few Common Questions About Wax Stains
Even with the best game plan, things can get tricky. You might be wondering if your hairdryer can do the job of an iron, or what to do about that stubborn pink stain your birthday candle left behind. Let's tackle some of the most common questions I hear about getting wax out of fabric.
Can I Use a Hairdryer Instead of an Iron?
Yes, you absolutely can. In fact, a hairdryer is often a much safer bet for delicate fabrics like silk or wool that just can't take the direct heat of an iron.
Just set it to low or medium heat and keep it moving a few inches from the fabric. This gently warms the wax. As soon as it starts to melt, blot it up with a clean cloth or a fresh paper towel. This technique gives you way more control and really cuts down the risk of accidentally scorching those sensitive fibres.
What If a Dye Stain Remains After the Wax is Gone?
Ah, the dreaded colour spot. This is left over from the dye in the wax, and you have to treat it as a separate stain.
A good first move is to gently dab the area with a cloth dampened with a bit of rubbing alcohol. But please, always test it on a hidden spot first! You could also try a good commercial stain remover before you toss it in the wash. Just remember the golden rule: never, ever put the item in a machine dryer until that dye stain is completely gone. The heat will set it for good.
The biggest mistake people make is throwing the item in the dryer too soon. Always let it air-dry first so you can properly check your work. If any hint of wax or dye is still there, the heat from a dryer will make it nearly impossible to get out later.
How Do I Get Wax Out of Upholstery or Carpet?
The approach for upholstery is similar, but you obviously can't throw your couch cushions in the washing machine.
Start by hardening the wax with an ice pack, then carefully scrape away as much of the solid stuff as you can. Next, lay a paper towel over what's left and gently press it with a warm iron on a low setting. Keep swapping out the paper towel for a clean one as it soaks up the melted wax.
If you're left with an oily spot, blot it with a cloth that's lightly dampened with a mix of water and a few drops of dish soap. "Rinse" the spot by blotting again with a separate, clean cloth dampened with just water, and then let it air dry completely. For more answers to specific candle questions, you can always check out our comprehensive candle FAQs.
At Shivora Candles, we believe in creating beautiful moments without the worry. Our premium soy wax candles are designed for a clean, long-lasting burn, making your home a sanctuary. Discover your new favourite scent and enjoy an effortless, elegant experience. Shop the collection at Shivora Candles.
