

You lit a wood wick candle for a quiet evening, settled in with a book, and now the flame looks taller than it did an hour ago. The crackle sounds sharper, the glass feels warmer near the top, and you're wondering whether you should blow it out, ignore it, or buy a special tool. That moment is where a wood wick trimmer earns its place, not as a guarantee of a perfect burn, but as one small part of a calmer routine.
Table of Contents
- Why Wood Wick Length Changes the Burn
- Choosing a Wood Wick Trimmer That Fits
- How to Use a Wood Wick Trimmer
- Care Habits That Keep the Wick Short
- Problems a Trimmer Cannot Fix
- A Calmer Burn Starts with the Candle
- Wood Wick Trimmer Questions
Why Wood Wick Length Changes the Burn
A tall, bright wood flame can change the mood of a room quickly. What started as a soft crackle beside the sofa starts to flicker higher, throw more light, and make you watch the jar instead of your book. You don't need to panic, but you shouldn't keep burning and hope it settles on its own.
A wood wick is a thin strip of wood standing in melted wax. The more charred, exposed wood sits above the wax, the more fuel the flame has to climb. Trimming shortens that strip after the candle is out and cool, so the next burn starts with a smaller, more controlled flame.
Trimming is flame control, not tidiness
Health Canada advises cutting candle wicks to 5 to 7 mm, approximately 1/4 inch, before lighting and trimming again every 2 to 3 hours to prevent excessively high flames, as set out in Health Canada candle safety guidance for Canadian households. That same guidance notes nationwide statistics weren't available, but estimates from Ontario, Manitoba, Alberta, and British Columbia indicated candles caused an average of nearly 800 fires per year from 1999 through 2008, with annual averages of 8 deaths, 115 injuries, and CAD $26.2 million in property damage.
Those are older figures, and they cover all candle fires, not wood wicks alone. They still explain why Canadian guidance treats wick length seriously. A short wick won't make an unattended candle acceptable, but it removes one common reason a flame runs high.
The visual below sums up what changes when wood is left too long.

A trimmer also keeps your fingers away from the jar rim and warm wax, although you should only use it once everything has cooled. Loose pieces of char need to come out before relighting, because debris left on the surface can catch, sputter, or sink into the melt pool.
A simple test: If the flame looks unusually high or restless, extinguish the candle, let it cool fully, trim the wick, and remove the cuttings before you light it again.
This advice supports the way Shivora Candles makes hand-poured soy candles and wax melts in Ontario, Canada, where care instructions matter as much as scent. If you're new to the format, our guide to how wooden candle wicks work and why they crackle explains the wick itself before you worry about tools. The trimmer is the follow-up, not the starting point.
Choosing a Wood Wick Trimmer That Fits
You don't always need to buy one. That's the honest starting point many product pages skip. A small, cooled fragment of charred wood on a shallow candle often breaks off cleanly between your fingers or lifts away with a tissue, a method also described in Sova Aromatics guidance on trimming a wooden wick by hand. A dedicated trimmer helps most when reach, visibility, or a clean cut becomes difficult.
Think about the jar in front of you, not the accessory drawer you'd like to own. A shallow, wide vessel gives you room to work. A tall, narrow jar that's half burned down does not, and that's where an angled or bent-neck trimmer earns its cost.
Match the tool to the candle stage
| Situation | Better tool | Watch for |
|---|---|---|
| Shallow candle, light char | Fingers or tissue on cooled wood | Crumbling char left on the wax |
| Deep jar, low wick | Angled wood wick trimmer | Scraping glass or tipping the jar |
| Stubborn, thick char | Clean, sharp nail clippers | Tugging the wick or loosening its tab |
| Wide opening, easy reach | Clean scissors held level | Dropping the cutting into the wax |
| Hard to see inside dark glass | Angled trimmer in good light | Cutting too much wood at once |
Nail clippers and scissors can work if they're clean, sharp, and able to cut without pulling. The risk isn't that they're the wrong brand of tool. It's that a dull edge crushes the wood, a straight handle forces an awkward angle, or the cut piece drops where you can't retrieve it.
What an angled head can and cannot do
An angled cutting head improves access. It lets the blades sit flatter over the wick while your hand stays outside the jar, and many designs catch the trimming so it doesn't fall. It doesn't fix tunnelling, mushrooming, a draft from a nearby vent, an off-centre wick, or a wick that was incorrectly sized for the vessel in the first place.
Accessibility matters too, and it's rarely mentioned. If you have limited hand strength, a stiff trimmer with a tight spring may be harder to use than breaking cooled char with a tissue. If your reach is limited or you can't see a dark wick against dark wax, a longer handle and a bright, stable work surface matter more than finish or colour.
- Choose fingers or tissue when the candle is cool, shallow, and the char snaps off in one piece.
- Choose clippers or scissors when you can see clearly, cut level, and lift the piece straight out.
- Choose a dedicated trimmer when the wick sits deep in the jar and straight tools scrape the sides.
Shivora's wood wick soy candles in 8 oz and 10 oz jars are the candles being maintained here, not trimmers sold as a cure-all. One 10 oz evening scent even carries a burn tip asking for a 1/4 inch trim before each burn. For a broader look at snuffers, lids, and trays, see our candle care accessories guide for Canadian homes. Buy the trimmer only if your jars make the simpler options awkward.
How to Use a Wood Wick Trimmer
One calm routine covers most burns. You won't need to measure with a ruler every time once you've seen what a short wick looks like, but measuring the first few times helps you learn the height.
The sequence below shows the order that matters most, cool first, cut second.
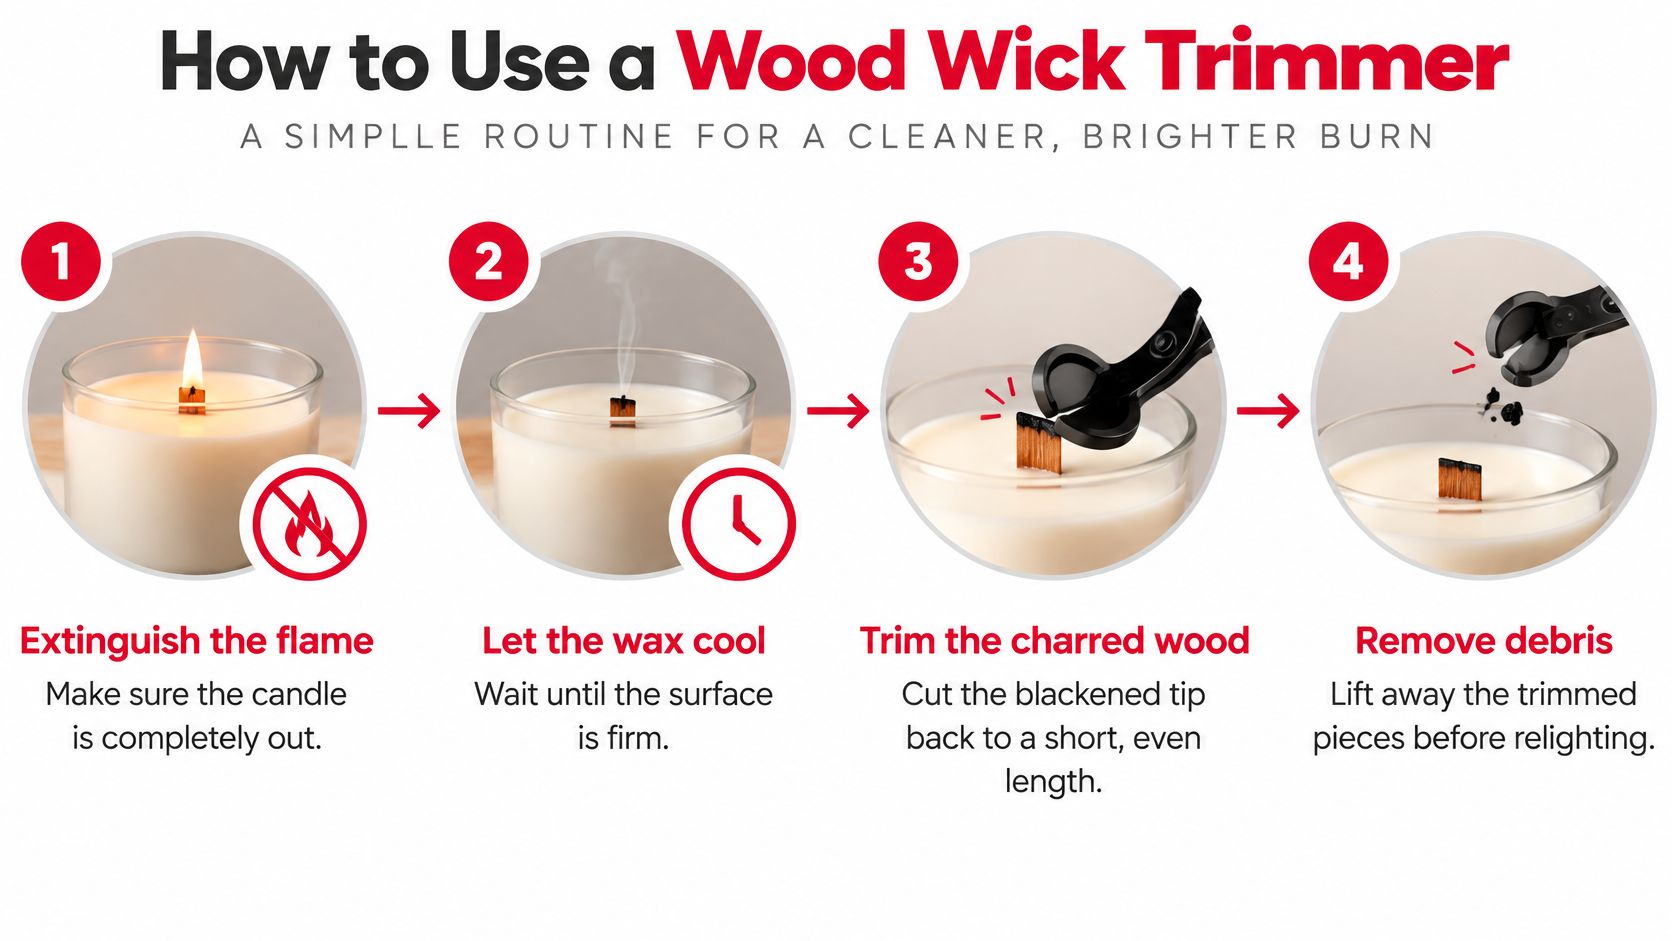
Extinguish the flame and walk away until the jar, wax, and wick are fully cool and the surface is firm. Warm wax looks set on top while still soft underneath, so give it proper time rather than testing it with a fingertip. Cutting into a soft surface makes a level trim harder and invites char to sink where you can't fish it out.
The cool-candle cut
Bring the angled cutter down over the wood so the blades meet the charred top only. Close the handles with steady pressure rather than twisting, and lift the cutting straight out onto a tissue. If the first cut leaves a ragged edge, take a tiny second cut rather than pulling at the strip.
Quebec fire prevention guidance specifies cutting the wick to about 5 mm before lighting and trimming again every 2 to 3 hours when necessary, as explained in Quebec guidance on candle fire prevention at home. That sits comfortably inside the 5 to 7 mm range from the opening section, so you're following one rule, not two competing ones. Aim for short and even, with fresh wood visible below the blackened tip.
- Extinguish completely and confirm there's no glowing ember on the wood.
- Wait for firm wax and a jar that's cool to handle comfortably.
- Cut only the char back to roughly 5 mm of wood above the wax.
- Remove every loose piece from the surface before relighting.
- Check the wick stands centred and upright, not leaning toward the glass.
Never trim a lit candle, and don't try to cut while the melt pool is liquid. A metal tool near a flame, hot wax splashing, and char dropping into liquid wax all turn a ten-second job into a messy one. If a flame has grown unusually high mid-burn, put it out and let the full cooling period happen before you touch the wick.
This short demonstration shows the hand position and pace on a cooled candle, which is easier to copy than a written description alone.
Consider a bedroom candle you burned last night. This evening, before a short supervised burn while you read, you trim the blackened tip, drop the cuttings on a tissue instead of the nightstand, and glance at the clean jar rim. The candle lights with a shorter flame and settles into its familiar crackle. Nothing dramatic happened, and that's exactly the point.
Trim when cool, cut the char only, clear the debris, then relight on a stable, heat-resistant surface.
Care Habits That Keep the Wick Short
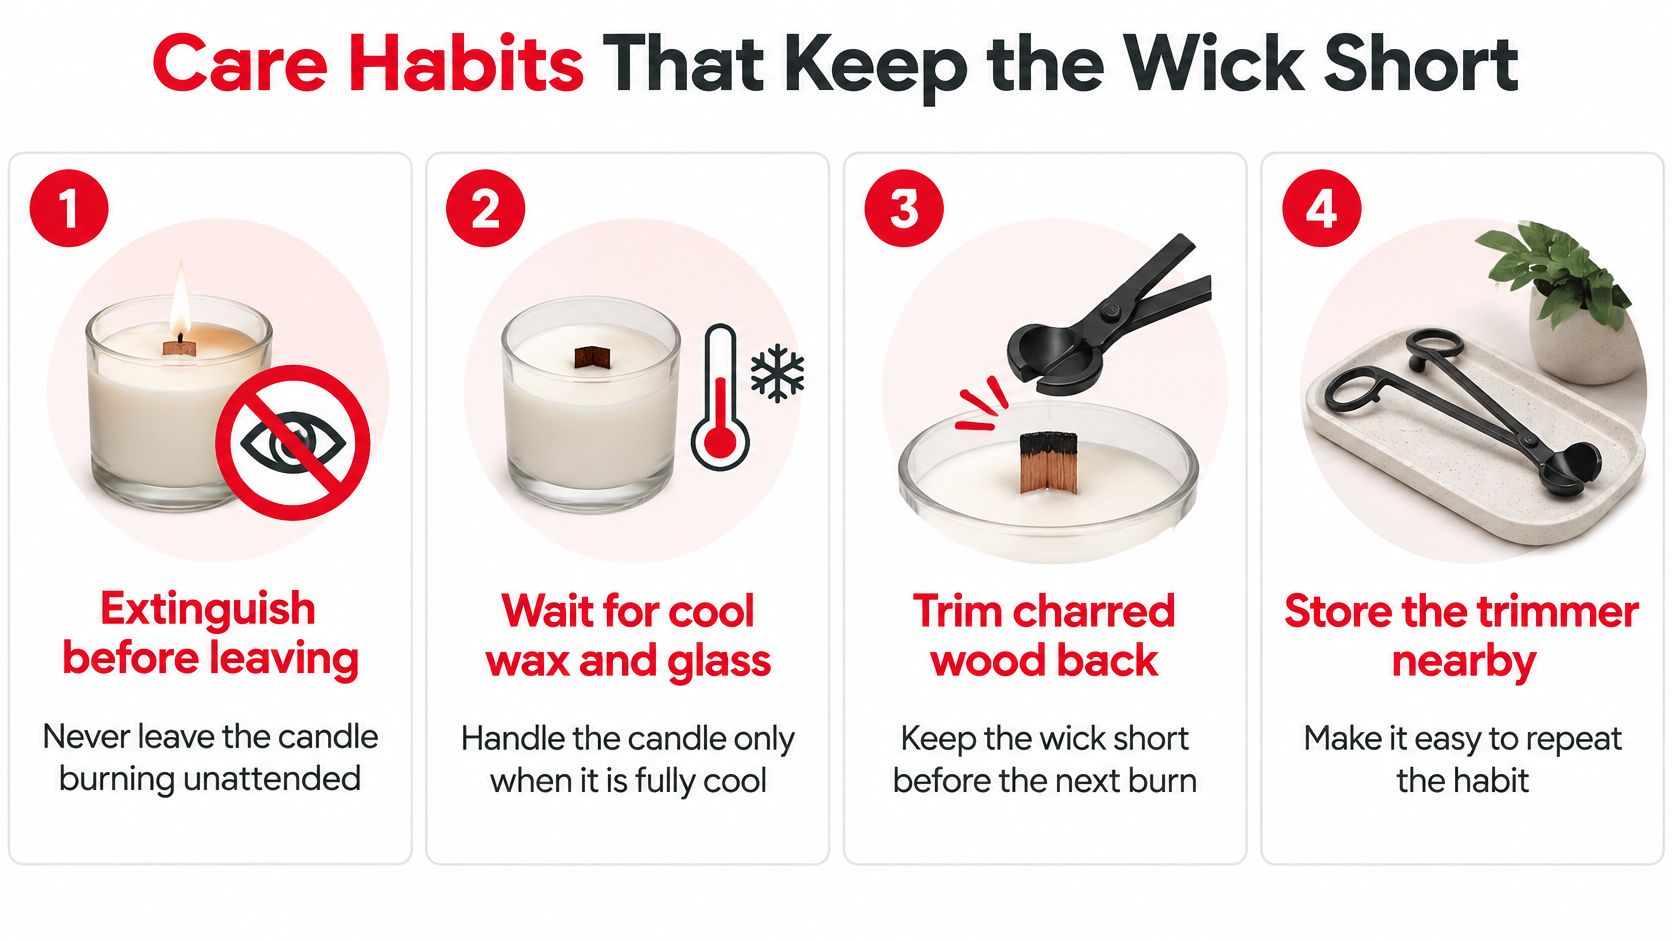
After an evening burn, the wax may look settled while the jar is still warm. Leave it where it is until both the glass and wax have cooled. A steady routine helps you spot when a trim is needed, but the trimmer is only one part of candle care.
The Canadian Centre for Occupational Health and Safety advises keeping the wick 5 to 7 mm high and trimming it every 2 to 3 hours during a burn. The same candle safety advice from the Canadian Centre for Occupational Health and Safety recommends a stable, non-combustible holder large enough to catch dripping wax. A trimmer can shorten charred wood; it cannot make an unstable surface safe or keep a candle away from curtains.
A rhythm you can repeat without thinking
Extinguish the candle before leaving the room, even if you expect to return soon. Once the wax and glass are cool, check whether the char needs trimming, then clear away any loose pieces. If your fingers have trouble controlling a small tool, tissue can help pick up cooled debris, while clippers may work if they fit the jar without scraping it.
Between-burns sequence: Extinguish the candle before leaving, let the wax and glass cool, check the wick, clear away loose debris, and return the candle to a stable, non-combustible surface.
Keep the tool that suits your candle close to your matches. For a shallow jar, fingers or clippers may be easier to control; a deeper vessel may call for a long-handled trimmer. The same small-check routine appears in a fall furniture care checklist, where regular attention helps catch maintenance needs early.
Shivora lists its 8 oz soy candles at approximately 40 to 45 hours of burn time. Treat that as an estimate, not a guarantee: actual burn time depends on wick care and how the candle is used. A quick check before lighting can help you notice when the wood has collected char, while supervised burn sessions keep candle care part of the routine rather than an afterthought.
Choose the tool for the jar and for your hands. The best routine is one you can carry out comfortably and consistently.
Problems a Trimmer Cannot Fix
It's frustrating to trim carefully, relight, and still watch a candle tunnel down the centre or drip over one side. Your first instinct might be to trim again, shorter this time. Resist it until you've checked whether length is the problem.
A long or crooked wick can contribute to uneven burning and dripping, so alignment matters. But a wick sitting off centre will melt one wall faster no matter how short you cut it, and a draft from a window, fan, or heating vent will lean the flame and leave wax standing on the sheltered side.
When to stop cutting and change the setup
Mushrooming, where a carbon cap forms and the flame sputters, and tunnelling, where the melt pool never reaches the edges, can both trace back to how the candle was burned or how the wick was sized for the jar. Trimming removes char. It doesn't resize a wick or replay a first burn that ended too soon.
- Trimmer scraping the vessel means stop, don't force the blade down a narrow jar.
- Carbon in soft wax means wait until the surface firms, then lift pieces out gently.
- Wick tab feeling loose after a hard tug means skip that burn until the candle can be checked.
- Flame leaning consistently means move the jar out of moving air and watch the next burn.
Relight only when the wick is short, centred, and free of loose wood. If the pool keeps missing the edges, our guide on how to burn a candle properly and avoid tunnelling in Canada covers burn session length and first-burn habits in detail. Those fixes happen at the match, not at the blade.
Sometimes the right answer isn't a better trim at all. In a busy hallway, a child's room, or any space where you can't supervise a flame, a flameless soy wax melt gives you fragrance without an open flame to manage. Knowing when to set the trimmer down is part of using it well.
A Calmer Burn Starts with the Candle
A wood wick candle is easier to enjoy when its scent, vessel, and placement suit the room. The trimmer is one small part of that routine; it cannot make an unsuitable spot or candle safe on its own.
The Love Spell Soy Candle Canada – 8 oz Wood Wick is hand-poured in Ontario with soy wax. Its fragrance opens with peach, grapefruit, and mandarin, then softens into cherry blossom, jasmine, and lily of the valley. The 8 oz size may suit a bedroom or make a thoughtful gift for someone trying a wood wick candle.

The 10 oz Blue Cedar & Lavender wood wick candle pairs lavender, eucalyptus, blue cedar, and sandalwood in a matte glass jar. Choose a stable, clear surface away from drafts, and keep any burning candle within sight. For ideas on wall placement and spacing, see the Slone Brothers Furniture sconce guide. A wall sconce and a jar candle have different placement needs, so follow the candle maker's care directions for the vessel.
If you share your home with pets, keep the candle out of their reach and burn it only while you can supervise it. Soy wax melts are an option when you prefer fragrance without a flame or wick to tend. Before ordering, you can browse the Candle Guide articles and the Candle Care and Safety page. Orders of $79.99 CAD or more qualify for free shipping across Canada, subject to published conditions; check the shipping policy for the current standard rate.
Wood Wick Trimmer Questions
Does trimming take away the crackle
A short, dry wood wick with a clean tip can still crackle. An overlong wick, or one covered with loose char, may smoke or struggle to stay lit. Health Canada recommends a wick height of 5–7 mm, so trim to a clean tip in that range rather than cutting the wood down to almost nothing.
Can the same trimmer work on a cotton wick
Yes. A trimmer can help keep either wick type short, though the cut feels different: cotton is a soft braid, while wood is a flat strip that needs an even snip across its width. Fingers or small clippers may be enough for an accessible cotton wick. Shivora's lead-free cotton wicks burn with a steady, quiet flame, so they won't produce the wood wick's crackle.
What should a gift buyer include with a wood wick candle
A short handwritten note can explain the care routine: let the candle cool, remove loose char before lighting, clear away the cuttings, and supervise each burn. That gives someone new to wood wicks clear steps to follow, whether the candle is 8 oz or 10 oz.
Where do the cuttings go
Catch them on a tissue, then put them in household waste once cool. Keep trimmed wood out of the wax and melt pool. If the jar is too deep to reach comfortably, use a trimmer rather than tipping the candle over a sink. Either Ontario wood wick candle mentioned above can give a new owner a chance to practise the routine.
Shivora Candles hand-pours soy candles and soy wax melts in small batches in Ontario, including candles with wood wicks. Visit Shivora Candles to choose a scent for an evening in, and check that the cooled wick is short before lighting.

